Sunday, February 28, 2010

I'm a little sketchy

Okay - that's totally not as cute of a title as I thought it would be. Bummer!

I still haven't gotten around to doing Virginia's sketch but it's on my list. Speaking of Virginia, she posted some info here on the Scrap Etc site about Memory Dock Planners and refills. There was a site she linked to that had great deals on Memory Dock stuff. Well, I've always wanted one but just never could spend the money on it when there was so much scrapbook paper out there waiting for me to buy it.

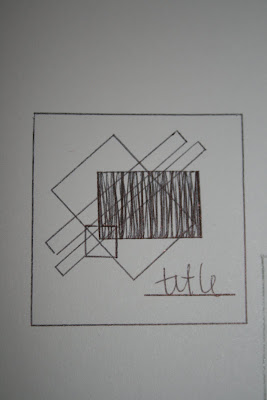
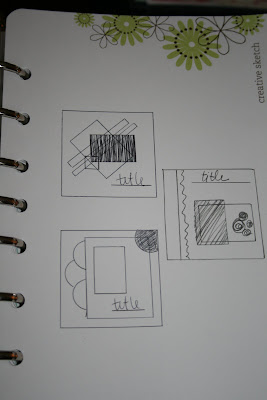
So, after her link, I ordered one and tons of refills super cheap! So now, I'm beginning to use it - making lists, notes about journaling and title ideas, and I'm using the little sketch template like crazy. I've never been much of a sketch scrapper - at least, I couldn't really come up with my own sketches - I just used other peoples sketches. Now, I love making my own sketches. I love that I can easily draw them out and with the template they actually look like what's in my head!!

Here's a peek at one page:


So, here's my sketch I picked for a Valentine layout of Cole . I have the layout ready, using the January Scripts Kit - just need to go pick up my pictures - so I'll post the layout in a bit!


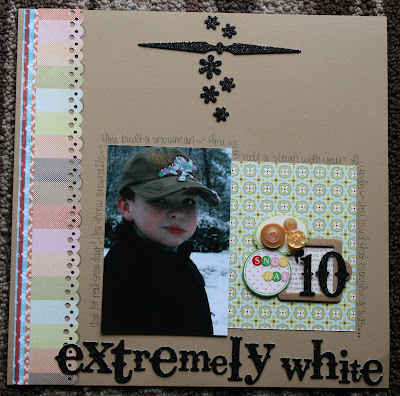
In the meantime, I did this with the February kit using one of the other sketches I did above:


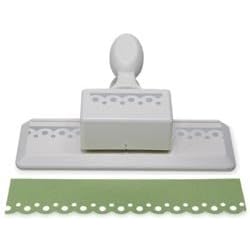
I changed my title placement and added journaling around the photo and paper on the bottom part of the layout. There's a Martha Steward punch I've been eying for quite some time:


But, I don't have it - YET - so I used my Fiskars border punch and added an extra hole punched with my Crop-a-dile - you can see it down the side of my layout. I colored all the little holes in with a black sharpie and left the big circles. I didn't exactly punch a straight line of holes, but it'll do until I get that yummy punch!!

So, wanna play along?? If you do any of these sketches, leave me a comment and let us see your layout!

Lisa

No worries, please!


This little bird house could not have come at a more opportune time!

I have really been going through a lot, and God has been working on me, through it all and one of the verses that I have claimed is this one:

"If God will take care of the birds in the air...how much MORE will He take care of Me!!" Matthew 6:26

So, I made this cute little birdhouse, as a little tiny reminder! It's in my studio, and it greets me when I walk up there (which is usually when I need a little getaway!)

Saturday, February 27, 2010

Happy Birthday Dare!

Today is my sweet Friend Dare's 29th Birthday!!!! Ok, so she is not 29, but she looks 23 : )
I used the Blackbird Scripts Kit and my two favorite flower punches to make her this little birthday card.


I made another card for a wedding party last weekend with this month's kit also. Our friends Richard and Kati are getting married in April. The bird house was perfect for a card about "setting up house".
Have a wonderful day!!!


Friday, February 26, 2010

Dollar Days- Hanger Puzzle Organizer

For those of you who are new followers to the blog, welcome!

If you are new reader, you may not know that my home is rather like a small preschool. I have four precious kiddos, and my oldest will be 5 in April.

I find more often than not, me reaching back into my memories of being a preschool teacher and using the ideas from the classroom in my home.

These hangers from the Dollar Spot at Target are awesome for decorating and holding all sorts of things.

I used the Blackbird kit (sold out!!) to make it pretty.


Knowing that kids need to SEE stuff, to play with it, I put some of their puzzle pieces in big plastic bags and clipped them up.
Now my kids' puzzle basket is a lot less jumbled up, and they can play with them a lot easier!


I think that these would be really cute for holding up kit bags, or organizing other things in your home. What would you use them for?

Thursday, February 25, 2010

Pedis and Love Birds......

I found this easel and canvas at Target for $5.99, but it was 75% off- my kind of deal! I knew of its potential, so I bought 3..... for only $1.50 I couldn't go wrong! I wasn't sure what I would do with it, until I came across this photo of my Aunt and Uncle (aren't they precious!) from way back. When I saw the Jeni Bowlin paper from the "Can't Buy Me Love Kit", "Love Birds" just popped into my head. And since they recently celebrated their 50th wedding anniversary, I thought it was appropriate! I used the black glitter letters from the "Black Bird" kit. I love it when I can combine kits.

before:


after:


This next picture is of a layout of my daughter and one of her many BFFs getting pedicures together! I LOVE the colors in the "Black Bird" kit! The orange, green, pink and yellow remind me so much of spring, which is right around the corner! And it is a reminder that it is about time to get my feet ready for flip flops!!!

Tuesday, February 23, 2010

Do you get your monthly dose???

We took a few things we had laying around and headed to California! Yes, Brittney, Gretchen and I decided at the very last minute.......I'm talking 3 days before booked our flights and went to CHA! I couldn't miss it. We didn't go this Summer and I couldn't stand not to see all my crafty buddies for one more minute! I booked my trip on Monday and called them. They booked their trip on Wednesday and we flew out on Saturday morning! Crazy, just crazy! It was so worth it. We took 2 pieces of paper, a few accucut cutouts, one alphabet and created the most wonderful kit for this month! We just walked from booth to booth picking out things from the newest companies out there to our old favorites! We made sure they were shipping immediately and voila the Black Bird kit was done! We were on a roll and completed the next two kits and most of the next 5! I love that feeling of accomplishment! So, here is what is in the kit that just shipped....btw...it is sold out!!!
Heidi Swapp circle paper
My Little Shoebox bird paper
My Little Shoebox notebook paper
Glitz Design heart paper
Glitz Design bird music paper
Lilly Bee Design green paper
Lily Bee Design pink dot paper
Lily Bee Design orange and yellow paper
1/2 sheet of October Afternoon green paper
1/2 sheet of Making Memories orange and green paper
Craft cardstock
Jilli Bean Soup green alphas
Pink Paislee glitter alphas
Glitz Design flowers
Wood Bird House
Stationary butterflies, celebrate spots, green dot card and flower envelope
Jenni Bowlin labels
Jenni Bowlin banner and alphabet
orange buttons
AccuCut clear flowers
AccuCut Hambly butterflies
AccuCut cardboard box birdhouse and label holders
AccuCut label book paper

We are going to open March for new subscribers. If you have been thinking about joining a kit club. You should check this one out!! We update almost EVERY day of the week! All the designers have different styles....so I know you will fit right in! We talk about everything from food to fashion. The kits will always have the latest and greatest products and sometimes old favorites that we still love!!

Our kits retail for 29.00 + 7.50 for shipping and handling. If you do not subscribe and we have extra kits, the retail is $36.00 + 7.50 shipping and handling. We bill through paypal on the 10th of each month and ship on the 15th of each month. All boxes ship Priority Mail. We try to find lots of unique items that you don't see in the scrapbooking industry. This month, you will notice the little butterflies and the flower envelope. They were found at a stationary sale. What about that birdhouse? It's made of wood and so cute! My mom thinks she will have a bird come to hers......not sure about that! It's not that big. We have an AccuCut machine and have so many dies! There is a birdhouse, butterflies and flowers in this kit! They turned out so cute! We are always on the lookout for vintage items. Last month we put an antique flat key in each kit. I have a source that is looking for things for me all the time.......There's no telling what we will find!!

Monday, February 22, 2010

Don't you just love brads?

A few weeks ago there was a lovely 60% off an item coupon for Michaels. I was so excited. I couldn't decide what I should buy. I mean 60% off is awesome. I wandered through the aisles thinking about something sort of big that I could get with my coupon. I looked at punches, but the one I really wanted wasn't there. I looked at Tim Holtz stuff, but moved on. I looked at other things in the store and didn't really find one big thing. Well, that's what happens when you work there and you buy stuff all the time. Then, I was helping a customer locate something and we were just chatting about scrapbooking (the best part of my job) and I saw this:


It's a brad maker.

I think I need it!!

So, I bought it and bought a few packs of the brads, too. I couldn't wait to play, but had too much going on at home to really dig into my scrapping supplies. I had a trip to Memphis coming up and knew there would be some spare time so I started pulling some of my older Scripts kits out - ones I just didn't get around to using all of. And grabbed my new tool. In the meantime, I looked around for reviews on this tool and really only found one or two and they weren't really detailed. They both said they had problems with the brads staying together but this was right when the tool came out. They contacted the company and got replacement brads and it never happened again. A coworker said she had played with it somewhere and the tool actually broke. So, I'm hoping all those glitches were just random and that the kinks are all worked out now!

The tool itself is around $35. The packs of brad parts are around $3 (there are three different sizes, I believe). There's a pack of templates, as well - $3, and a punch that was around $11, I think. I wasn't willing to buy the punch yet though, but may later.

I opened all my goodies and got to work. I picked the size I wanted for my first brad, traced the template and cut out the paper. So far, so good. Used the packaging directions and made my first brad. It was pretty simple. Oh - the tool comes with a dvd showing full instructions, but I haven't watched it yet.

Here's my end result:


(don't you like how that one button is just hanging there, ready to fall off? lovely! must go back and stitch instead of glue dot that!!)

Here's a close up of my brad:


I used my September Scripts kit and these pictures from a mini photo shoot near Carol's house. Every time I drive over there, I get a little giddy over this spot in the road. I love the trees making a canopy over you as you drive through. I tell her every time I come over that I want to take pictures there and finally we did. I just loved this photo of Cole in the road - he looks so tiny compared to the surroundings!

I only made one brad and it's used to hold the tag down with my journaling. I think it turned out well. You can see the paper where it buckles a little around the brad, but I don't mind it too much. I think a thinner paper would probably be a better choice for this. Cardstock would probably not look good at all since it's so thick.

In the end - here are my thoughts:

Good points:
  • with the coupon - it was a steal at around $14.
  • the directions were super easy to follow.
  • brads to match anything you could imagine.
Bad points:
  • wouldn't buy it without a coupon, but I'm pretty thrifty
  • thick paper won't work out very well
  • using the template to cut your paper is a little time consuming, but this isn't a deal breaker
  • I believe the punch is only good for one size brad
  • not enough time in the day to make all the brads I would want to make!!

So, all in all, I really like my new tool. I haven't had a chance to play with it again yet, but hopefully soon!! I want to try some thin fabric and tissue paper and see how that turns out and would also love to buy the adapter to make the big brads. This tool only does two sizes, but they have an adapter for a third. I just hope this is a tool that sticks around so I can find the parts I need for a while. I may have to just keep stocking up when good coupons are available - just in case!!

Oh - if you ever come across about 60% off coupon - use it while you can! The rumor from Michaels is it won't happen again. Turns out the coupon was for certain states only, but ended up being taken everywhere. I know the Michaels I'm at had tons come through!!

Have a wonderful Monday - despite the gloomy weather outside. If you have a tool you've purchased lately - let us know about it. And if you have this tool - tell me what you think! How do you like it!!

Lisa
Sunday, February 21, 2010

From the Sketchbook

I love to do sketches in my free time, when I have lots of ideas floating through my head, but I don't have time to sit down and scrap.

You know, like when I'm sitting and feeding the baby... or listening in church. I know, bad!! It really does help me concentrate, though! :)

Here is a sketch from my sketchbook:


and here is how I interpreted it with the new kit!


I would LOVE to see how you interpret this sketch! Rotate it, make it your own- and then link it back here! :)

Saturday, February 20, 2010

She's Three Today!!!!


Happy Birthday to my sweet Baby Girl! I CANNOT believe she is 3 today!!!

I got this kit just in time for some birthday layouts. This one is not so birthday, but I just had to print out these two pics of Cam hamming it up for the camera (can I have some cheeze with that ham?).

I used the 6x12 Making Memories patterned paper across the back (I love this paper!!!). Then, I free hand cut a circle from the blue Lily Bee, and then cut it in half to make two semi circles. I placed them on diagonal opposites right under the edge of the MM paper. Then, I used the Jenni Bowlin pennant stickers to make "rays" coming out from the semicircles. I loved the vivid red in the Glitz patterned paper and loved the way it coordinated with the MM patterned paper.

Wednesday, February 17, 2010

waiting......

Spring is my favorite season. I love the warmer weather, the sunshine, the daffodils and tulips, birds' nests, and of course, the Dove Truffle Eggs that appear right after Valentine's Day! I am getting impatient.... I want to see signs of spring now. This winter has been crazy cold and it is time for change. A warm change!
I LOVED getting my hands on this months Script's Kit! It is full of reminders that spring is on its way-- birds, bird houses, flowers, springy colors. It makes me happy just looking at it! I knew right away that I wanted to do a layout about spring, but one problem..... it is not spring outside yet {just in my heart!}. So no pictures. So my layout sits.... waiting... just like me... for spring. But I will add some of my favorite pics from this spring as soon as I can!
And please forgive the awful picture. For some reason, iphoto is not being nice to me right now, so the only way to get a picture was to use my phone. I will post an updated picture of my layout once it is complete.

Tuesday, February 16, 2010

Fashion week in NYC

My internet access has been OUT since last Thursday and I haven't been "online" since. I do have a Blackberry (aka Crackberry) and have had limited access to my email and, of course, Facebook. It's just not as easy as being on the laptop. I haven't seen this blog since last Wednesday. I have to say, today, while sitting in the library, I was completely blown away! They have just been rocking along and sharing beautiful things all weekend!!

Since it is Fashion Week in NYC and I am completely in awe of all things fashionable. I decided to show you how I use my Scripts Kit for fashion. Granted, this was an easy one!

I had the idea for this kit to add a key. I have a source that keeps me in the old key business.....luckily! He found me enough old keys for each and every person! I was so excited when I saw them. They all were very different and each had a unique quality. I wrapped them all in twine and packed them away in each kit. I had the whole "key to my heart" idea since it was closing in on Valentine's Day. Right after that, we went to CHA and Making Memories came out with their new line called, Vintage Groove. I LOVE it! I was totally inspired after doing the make n take necklace to find vintage pieces to make jewelry! Aha!! That's where my little key comes in! I added it with a couple of pieces from MM and made this adorable necklace! I've been collecting lots of old things to make several more!
If you haven't used your key for anything, pull it out and put it on a chain. You will get lots of comments and compliments!

3 things I've learned for Fall 2010 from this week of Fashion.
1. Chocolate Milk nail color
2. Color tights with black shoes
3. Matte lip...no gloss

I'm ready!


I have to say that I must be one of the luckiest people on earth. I can't begin to explain how much I adore the girls that support this Scripts kit. Virginia, Katie, Brittney, Carol and Lisa all add so much to our team. It is amazing how we all have different qualities to bring to the table. They all go together so well. I am proud to have them as a part of this group and to call them my friends.

Monday, February 15, 2010

More Can't Buy Me Love creating!

You know, sometimes you get in the grove and you are creating away. Then suddenly you need something in a specific color and you can't find it. You don't have all the embellishments on hand that you have pictured in your mind (or you can't locate them in your stash). I hate when that happens. Usually I can come up with a suitable substitute but not always.

For Valentine's, I don't really decorate, but I decided to at least make a little banner to hang up and actually managed to hang it before Valentine's but just haven't managed to share it here.

I used the "Can't Buy Me Love" kit! I was hanging out with my fellow Scripters - Carol and Virginia. All I had with me were my basic supplies and the kit. I wanted to cut out the banner pieces in a scalloped shape - just to make it more girly and frilly. Since I didn't really have anything with me to use for my shape - I just grabbed the plate Virginia had put yummy chocolate chip cookies on, and traced it's edge. Thank goodness she had a cute plate, huh?

I just didn't have the right shades of pink and blue cardstock with me to go with the yummy Jenni Bowlin paper. So, I just worked on the Jenni Bowlin paper and waited for all the other extras.

I left my project alone for a week or so and then dug everything back out. Sometimes leaving it alone is a bad thing, but for me - when I went back to it, I was ready to finish and hang it up then!! Then I remembered I still didn't have any cardstock to match - at least not to match what was in my head.

So, off to the kitchen I went. I got lost in blogland last week and saw where someone was dying coffee filters to make flowers. They used food color to tint the water and dipped the coffee filters in and then laid them on a cookie sheet and popped them in the oven to dry. I had no food color! I did have icing color so I thought I could try that. I filled a giant pot with warmish water and used a toothpick to add some color to the water. It took much more than I thought, but in the end, I got the result I wanted.

I took my coffee filters (once they were dry) and crumbled them up and stitched a few together in different colored layers. In the end, I got this:


You can't really see it - but it does say BE MINE on the very middle two pieces. Here's a close up of my coffee filter flowers:


I wanted to hang it in a doorway, but having a tall husband puts a cramp in my banner style! So, I picked a doorway we don't really use (the back door).

So next time you think you don't have just what you need - head into the kitchen and whip something up. Of course, you could also use tissue paper since it comes in a wide variety of colors. I've started just buying tissue paper when I see something different, a different color or pattern, just to hold on to, just for when I need a specific color and don't have time to dye something to match. Coffee filters are super cheap though and this was a really easy way to get the colors i was looking for!

So, what do you do when you don't have just the item you need? What are your solutions?

Lisa

Sunday, February 14, 2010

HAPPY VALENTINE'S DAY (sorry for the technical difficulties)y.


Ok, so yesterday I tried (in vain) to upload the pictures from my camera to my computer. I seriously tried like 5 times. I finally gave up.

This morning, I got up and charged my camera battery. Apparently, that did the trick.

So, here is another Scripts Kit project just in time for Valentines Day! I made a thank you card for my Dad for watching our dog a few weeks ago. He loves Starbucks so I got him a Starbucks gift card. I used the tea technique I wrote about last week on the white felt heart. Since the felt is partly acrylic (I think), the tea gave nice variations to the white so it wasn't solid ecru. I adhered the hear to one of the red tabbed pages from this month's kit and anchored it with a sticker, button and some embroidery thread.

I was lucky enough to find a free version of the fling font for my computer and that is what I used to write "thank you" on the paper. I then adhered the thank you to the heart with adhesive.

Since I used the tabbed page for my card, I had to make my own envelope. The brown Jenni Bowlin paper was PERFECT for this. I love Jenni Bowlin paper. It has a thinner weight than alot of other Patterned Papers. It really lends itself to altered items and folding, etc. I used one of the Sassafras stickers as a label and adhered the envelope all together.

Friday, February 12, 2010

How I Organize My Scripts Kits

I've kind of migrated to making my scrapping stuff more easily portable. I do a lot of scrapping in the living room, with my husband, while we watch tv together, or in my bedroom, or with my friends, or at the craft table with my kids... you get the picture!

Because of this, kits are AWESOME for my type of scrapping. Everything is in one spot and I don't have to hop up a million times for whatever things I need.

However, keeping all of the kit in a plastic bag doesn't prove to be the easiest way to find stuff within the kit.

Let me introduce you to one of my favorite purchases of all time. I bought this around 2 years ago.

My Rubbermaid drawers. (You can buy them here - 3 sets of these for $30!)

The drawers are 14x14" so there is plenty of room for all your papers & such.
Two drawers are for kits, and one is just for "new purchases." (hehe)

The cool thing about these is that you can pull the whole drawer out and bring it with you wherever you are going to scrap.

I also bought these little lunch trays (I think at Target- on clearance!) a while back and have them sitting in the top of the drawer. They hold all the smaller bits and pieces nicely.
The little tray can easily lift out and be set aside so you can rifle through the rest of the drawer's contents.
One other thing I like to do (and I know B is gonna laugh; she always teases me about using every last scrap!). When I'm working on stuff, I end up with a pile of papers like this:
I like to pull out a few fave punches, and punch the heck out of them, and then toss the rest.
I add those right into my little tray and have pre-made embellishments for the next project I'm going to do! I hope this helps!

I would love to hear your kit organization ideas; what do you do with the leftovers from your kits?

Thursday, February 11, 2010

January 2010 in review


This layout does not "look like me" in my opinion. But, I like it.

I love these little Jenni Bowlin calendars, and I would love to have great hopes of doing every month, as a month in review?! We will just see how that goes.........

But for now, here it is. The 2010 is Heidi Swapp chipboard letters from my stash. They were pink. So, I ripped off the top layer, and inked them...a little rough.


And, then a card......just a note!

Tuesday, February 9, 2010

The Girls Paperie---PreSale!

We were blown away by Margie's new line The Girls' Paperie. I loved both collections so much, I decided to order the whole line and offer it to you! We ordered both entire collections.
The Paper Girl line is $70.00 Here are the pictures from both collections.


You can purchase yours --------------->>>>>>>>>>>>>>>>>


On Holiday $40.00 - both collections are in the paypal store to the right. click on the sample to purchase!! Enjoy!